The Irish Sweep is still accepting calls to answer questions and schedule any service needs. However, no on-site visits are currently being conducted pursuant to the government's stay in place order. Please feel free to contact us at 510.521.4088 to get answers to your questions or schedule a future appointment.

Seismic Safety: Why Chimneys Are the Weakest Link in Earthquakes & What You Can Do About It

After the recent earthquake with its epicenter right in Dublin, a lot of us Bay Area folks are asking the same thing: Is my home really ready for the next one?

Chimneys are one of the most vulnerable parts of any home during an earthquake. Especially if they were built before modern building codes, they likely weren’t designed with seismic safety in mind. And chances are, yours hasn’t had more than a passing glance in years.

But here’s the thing: a little preventative maintenance now could help you avoid major repairs (and major expenses) later. With inflation making everything more expensive, catching small issues early is smart and cost-effective.

Why Chimneys Are So Vulnerable During Earthquakes

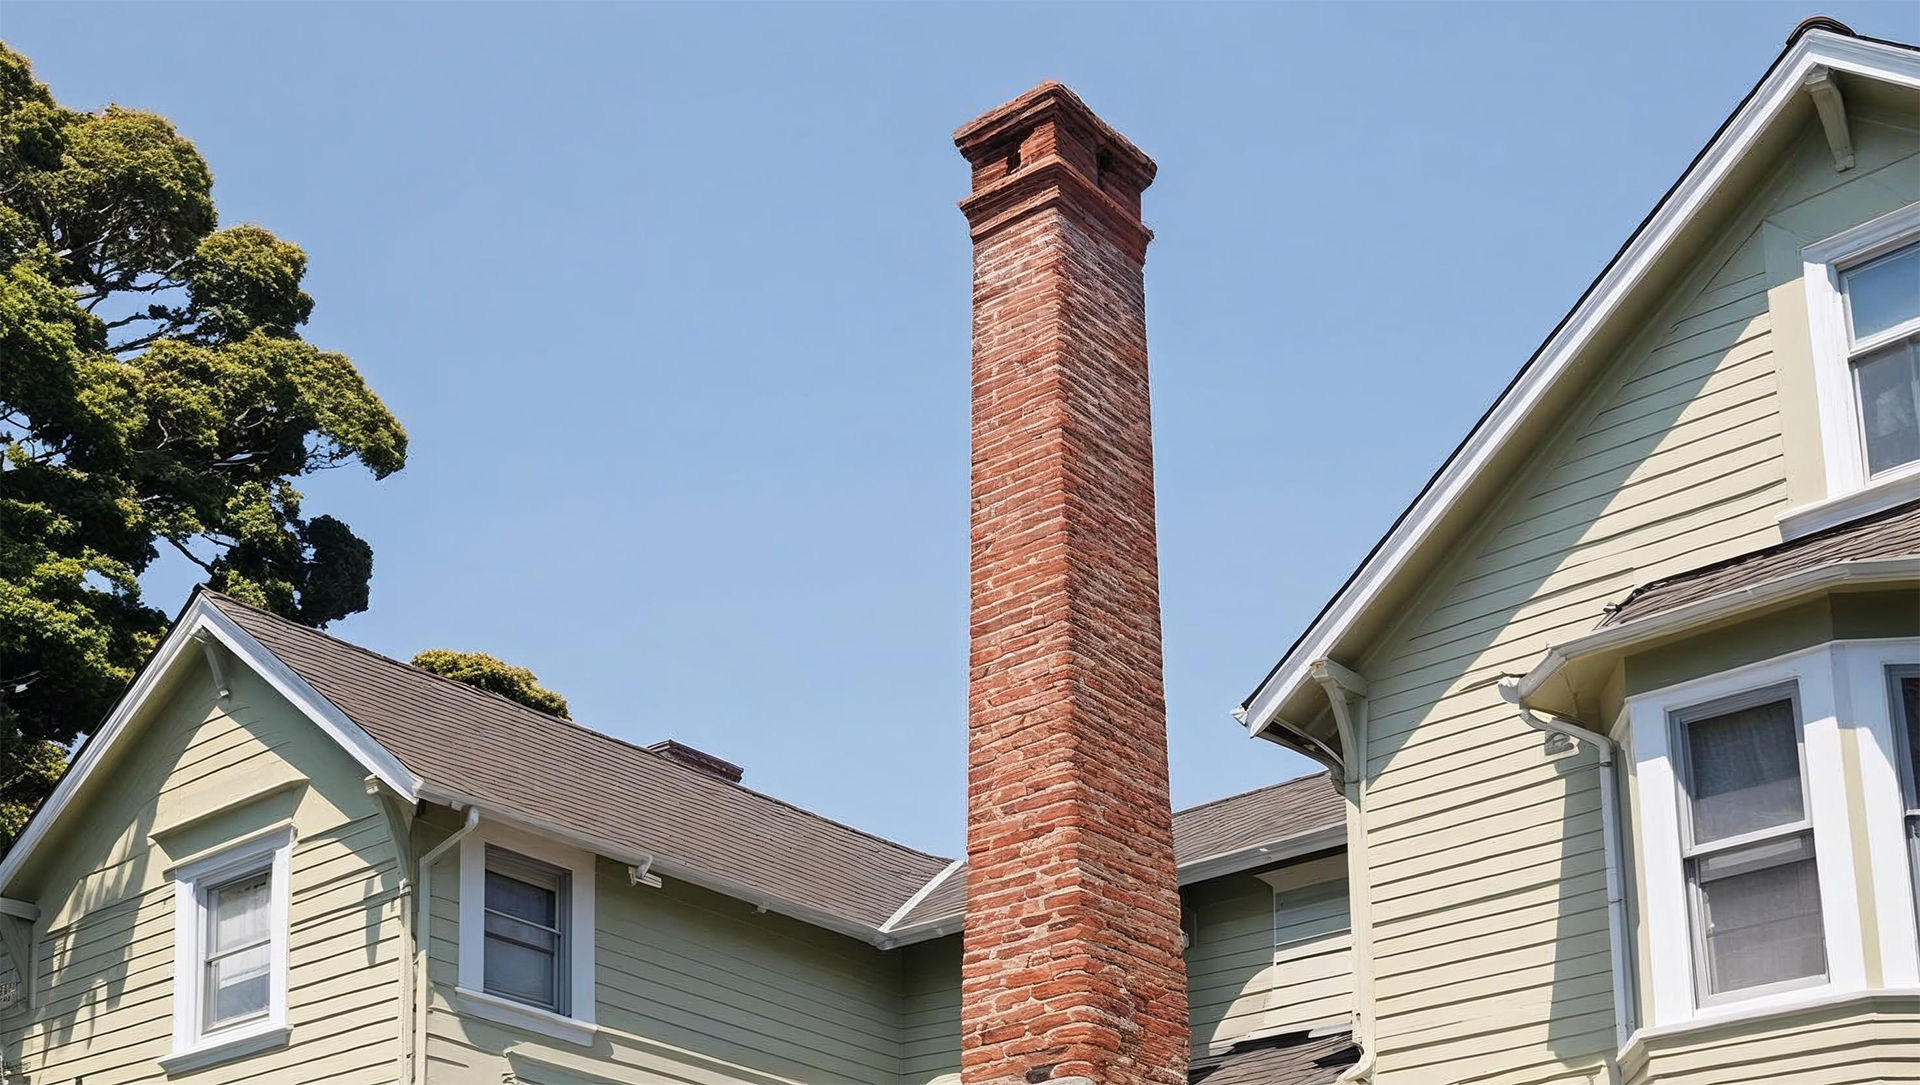
Chimneys might look solid, but when an earthquake hits, they’re one of the most fragile parts of a home. Why? It comes down to how they’re built. Most chimneys are tall, narrow, and made from heavy masonry. That combination creates a rigid, top-heavy structure with little ability to flex or move with seismic waves.

It’s also important to note that in some Bay Area cities, it’s currently impossible to pull a permit for chimney reconstruction due to local building restrictions or updated codes. This makes routine maintenance, repairs, and proactive safety measures even more critical.

Unreinforced Masonry = Fragile Structure

Unlike modern construction that relies on steel reinforcement or flexible materials to absorb shock, many chimneys—especially older ones—are made with unreinforced brick or stone. Without internal supports like rebar, these materials can’t handle the lateral forces of an earthquake. Once the shaking starts, cracks form quickly. Tall, slender chimneys are most vulnerable.

Shaking Targets the Weakest Points

During an earthquake, the violent motion doesn’t hit every part of your house evenly. It targets weak spots—places where weight is concentrated or materials that can’t flex. Chimneys, especially those that rise above the roofline without lateral bracing, take the brunt of that force. They can:

  • Crack along mortar joints
  • Separate from the wall
  • Collapse onto the roof or through ceilings
  • Create fire hazards if flue linings are damaged

Sometimes the damage is dramatic and obvious. Other times, it’s hidden inside the structure—cracks behind the plaster, loosened bricks, compromised flue tiles. You may not notice the issue until months later, when rain starts leaking in or pests find their way through gaps you didn’t know existed.

Even “Small” Damage Can Lead to Big Problems

A leaning chimney or missing mortar might not seem urgent, especially if everything still looks more or less intact. But any structural compromise can escalate fast. And if you plan to sell your home? A compromised chimney will come up during inspection—and likely cost more to fix under pressure.

Older Homes Pose a Risk 

Many older chimneys in the Bay Area were constructed long before modern seismic codes existed. Consider these facts:

  • San Francisco’s Housing Stock: According to U.S. Census Bureau data, approximately 44% of homes in San Francisco were built before 1940 before the introduction of reliable seismic codes. ​
  • Non-Ductile Concrete Buildings: Estimates suggest that San Francisco has up to 3,000 non-ductile concrete buildings constructed before 1980, which are vulnerable during earthquakes. ​
  • Soft-Story Buildings: Widespread across the Bay Area, soft-story homes have a weak first floor (often due to garages or open layouts), making them prone to collapse. Many of these also have masonry chimneys perched on top, adding even more instability. Following the 1989 Loma Prieta earthquake, it was identified that hundreds of soft-story structures in the Bay Area required retrofitting.

If your home was built before the 1980s and still has its original chimney, there’s a strong chance it was never designed with seismic safety in mind.

And here’s the thing: damage isn’t always obvious right away. A chimney might look fine from the outside but have internal cracks or instability that make it unsafe. That’s why preventative seismic safety inspections are so important—especially if your chimney is older or hasn’t been checked in years.


What Chimney Repairs Really Cost (And Why It Pays to Act Early)

Chimney damage is both dangerous and expensive. Even small cracks or missing mortar joints can run you several thousand dollars in repair costs, especially if scaffolding or specialty materials are required. If the damage is severe enough to warrant a full teardown and rebuild after an earthquake, you could easily be looking at a five-figure bill—and that’s just for the chimney itself.

The costs don’t end there. A compromised chimney can cause damage elsewhere in the home: roof punctures, interior water leaks, even fire or carbon monoxide risks if the flue is no longer aligned properly. And in a competitive housing market like the Bay Area, chimney issues can torpedo a sale or delay a closing, forcing rushed repairs at premium prices.

Insurance might not always help as much as you’d hope, either. Some policies exclude earthquake-related damage unless you’ve purchased additional coverage. And even then, deductibles for seismic claims are often high—meaning you’re still covering a big chunk of the cost out of pocket.

That’s why preventative inspections and seismic safety retrofits are such a smart investment. They’re a proactive way to protect your home and your wallet—by catching problems early, making targeted reinforcements, and avoiding the massive financial hit that often comes with post-quake repairs. A little work now can save you a fortune later.

What You Can Do About the Seismic Safety of Your Chimney 

The good news? You’re not powerless here. There are several steps we can take—some simple, some more involved—to make sure our chimneys aren’t a weak spot in the next earthquake.

Start with a Professional Inspection

If it’s been a while since anyone took a close look at your chimney—or if you’re not sure when it was last inspected—it’s time. A professional chimney sweep who understands seismic risk (like our team at The Irish Sweep) can assess the current condition of your chimney, look for early signs of cracking or instability, and let you know whether retrofitting or repairs are needed. This is especially important if your home was built before the 1980s.

Retrofit If Needed—Before It’s Urgent

Seismic retrofitting might sound like a big deal, but it’s often more manageable than people think. Reinforcing your chimney with steel bracing, anchoring it more securely to the structure of your home, or even rebuilding it with different materials can significantly reduce the risk of collapse during an earthquake. And doing it before something goes wrong is always more affordable than paying for emergency work after the damage is done.

Keep Up With Regular Maintenance

Chimneys naturally wear down over time. Mortar erodes, bricks shift, moisture gets in. Keeping up with regular servicing—repointing joints, sealing gaps, repairing minor cracks, waterproofing—keeps your chimney stable and less likely to fail when shaking starts. Plus, regular care means smaller, more affordable fixes instead of major overhauls.

Don’t Wait for the Next Earthquake

Seismic safety isn’t just a concern after a quake—it’s something to think about before the next one hits. And in the Bay Area, it’s not a question of if, but when.

According to the U.S. Geological Survey, there’s a 72% chance that a magnitude 6.7 or greater earthquake will strike the Bay Area within the next 30 years. That’s not a distant possibility—it’s a high likelihood in our lifetimes. Fault lines like the Hayward, Calaveras, and San Andreas all run through or near heavily populated areas. The 1989 Loma Prieta earthquake was a reminder of just how disruptive and dangerous these events can be—and that wasn’t even considered the “big one.”

Recent quakes, like the one centered in Dublin, only reinforce how active and unpredictable this region is. And smaller quakes can still do significant damage—especially to older, unreinforced masonry structures like chimneys.

The bottom line: if your chimney hasn’t been inspected or retrofitted, now’s the time. Earthquakes don’t follow a schedule. Preparing ahead of time is the only way to make sure you’re not left scrambling after the fact.

FAQ: Does My Chimney Need a Seismic Inspection?

Q: My chimney looks fine—do I still need to worry about seismic safety?
A: It’s good to get an inspection even if your chimney looks okay. Many issues—like internal cracks or a compromised flue—aren’t visible without a professional inspection.

Q: What are signs my chimney might be vulnerable in an earthquake?
A: Watch for:

  • Cracks in bricks or mortar
  • Leaning or gaps where the chimney meets the wall
  • Smoke backing up into your home
  • Rust stains or missing mortar
  • Built before the 1980s without retrofitting

Q: Why are chimneys so vulnerable during earthquakes?
A: They’re tall, rigid, and made of heavy masonry—often without internal support—making them one of the first parts of a home to crack or collapse under seismic pressure.

Q: What’s the risk of ignoring small cracks?
A: Minor damage can lead to major problems over time—like water leaks, carbon monoxide exposure, or total collapse in the next quake.

Q: What’s involved in a seismic retrofit?
A: Retrofitting may include anchoring the chimney to your home, adding bracing, reinforcing the flue, or rebuilding unstable sections with modern materials.

Q: Is a retrofit expensive?
A: It’s far more affordable than emergency repairs after a quake—and much safer. Early action protects both your home and your wallet.

Q: Does homeowner’s insurance cover chimney damage from earthquakes?
A: Not always. Many policies require separate earthquake coverage, and deductibles can be high. Prevention is key.

Q: How often should chimneys be inspected?
A: We recommend at least every 2-3 years.

Q: Who should I call for an inspection?
A: Choose a qualified chimney professional with seismic safety expertise—like The Irish Sweep.

Ready to Take the Next Step? The Irish Sweep Can Help

You don’t have to wait for the next earthquake to take action. At The Irish Sweep, we’ve been serving Bay Area homeowners for over 40 years—and we understand the unique seismic safety challenges this region presents. Our team is trained to spot hidden chimney vulnerabilities and recommend the right solutions to keep your home safer, longer.

Whether your chimney needs a full seismic retrofit, routine maintenance, or just a professional once-over for peace of mind, we’re here to help. We’ll walk you through what we see, explain your options clearly, and never push work you don’t need. Our goal is to help you stay ahead of the damage—not pay for it after the fact.

Protect your home. Protect your investment. Schedule a seismic chimney inspection with The Irish Sweep today. Let’s get ahead of the next shake—before it costs you more than it should.

Why You Need a Chimney Inspection & Sweep Before Installing Any Gas Appliance in Your Wood-Burning Fireplace

If you’re considering upgrading your wood-burning fireplace with a gas fireplace insert, you’re not alone. Many homeowners love the convenience, efficiency, and cleaner burn that gas appliances provide. However, before you proceed with the installation, it’s crucial to schedule a professional chimney inspection and sweep. Ignoring this step could lead to serious safety hazards, costly repairs, and even risks to your home and health.

In this guide, we’ll explain why a chimney inspection and sweep are essential before installing any gas appliance and how they ensure a safe and efficient fireplace upgrade.

The Hidden Dangers in Your Chimney

A gas fireplace insert may not produce the same creosote buildup as a wood-burning fire, but that doesn’t mean your chimney is automatically safe. Over time, chimneys can develop blockages, structural damage, and hidden defects that could become dangerous when introducing a gas appliance. Here’s why an inspection and sweep are non-negotiable:

  1. Removing Creosote and Debris

If you’ve been using your fireplace to burn wood, chances are there’s a layer of creosote buildup inside the chimney. This highly flammable residue must be removed before installing a gas fireplace insert. Even though gas doesn’t produce creosote, old deposits can still pose a fire risk.

Additionally, bird nests, leaves, and other debris could be blocking the flue, preventing proper venting. A sweep ensures that the chimney is clear and ready for safe operation.

  1. Checking for Structural Damage

Over time, chimneys develop cracks, deteriorating mortar, or damaged flue liners. These structural issues can lead to carbon monoxide leaks, poor draft, and even chimney collapse in extreme cases. A thorough inspection will identify and address any weaknesses before installing a gas fireplace insert.

  1. Ensuring Proper Venting

Gas appliances produce carbon monoxide (CO), an odorless, deadly gas. Unlike wood-burning fireplaces that rely on natural draft, gas fireplace inserts require specific venting conditions to operate safely. If the chimney is blocked, damaged, or improperly lined, carbon monoxide could seep into your home.

A Level 2 chimney inspection will confirm that your chimney can handle the venting needs of a gas fireplace insert, ensuring safe combustion and exhaust.

gas fireplace insert

Gas Fireplace Inserts Require a Different Chimney Setup

When switching from wood to gas, your existing chimney may not be properly designed for a gas fireplace insert. Gas appliances often vent through two aluminum liners to improve efficiency and prevent condensation buildup, which can deteriorate masonry chimneys over time.

A certified chimney sweep will inspect your system to ensure the chimney is in good condition for the installation. The, venting components must be installed according to the gas insert manufacturer’s specifications.

Preventing Carbon Monoxide Poisoning

A malfunctioning or improperly vented gas fireplace insert can introduce carbon monoxide into your home. This is why regular chimney inspections are essential—not just before installation but as part of ongoing maintenance.

During an inspection, professionals will check for:

  • Blockages that could trap exhaust gases
  • Proper draft and ventilation
  • Cracks or leaks that could allow CO to enter your living space

For added safety, always install carbon monoxide detectors near your fireplace and sleeping areas.

Meeting Local Codes and Manufacturer Requirements

Most cities and counties require a chimney inspection before installing a gas fireplace insert. Additionally, many manufacturers void warranties if the appliance is installed in a chimney that hasn’t been properly inspected and swept.

By scheduling a professional chimney service, you ensure that your installation meets safety codes and manufacturer guidelines, protecting your investment and your home.

How to Choose a Qualified Chimney Professional for Your Inspection

Not all chimney sweeps and inspectors are equally qualified to prepare your fireplace for a gas fireplace insert. Choosing the right professional ensures a thorough, reliable inspection that meets safety standards.

Here’s what to look for:

  • Certifications and Training – Look for a professional certified by the National Chimney Sweep Guild (NCSG). These credentials indicate proper training and adherence to safety protocols.
  • Experience with Gas Fireplace Conversions – Not all chimney services specialize in gas fireplace inserts. Make sure your chosen professional has experience evaluating and modifying chimneys for gas appliances.
  • Inspection Capability – A chimney inspection is required when making changes to a fireplace system, such as installing a gas fireplace insert. Ensure your inspector offers this advanced inspection, which includes video scanning of the flue.
  • Reputation and Reviews – Check customer reviews and testimonials to confirm the company’s reliability, professionalism, and quality of service.
  • Clear, Detailed Reports – A trustworthy chimney inspector will provide a written report with photos, outlining any necessary repairs or modifications before installation.

By selecting a qualified chimney professional, you can confidently move forward with your gas fireplace insert installation, knowing your home is safe and compliant with all regulations.

The Cost of Skipping a Chimney Inspection

Failing to inspect and sweep your chimney before installing a gas fireplace insert can lead to:

  • Increased risk of house fires
  • Dangerous carbon monoxide leaks
  • Expensive structural repairs later on
  • Inefficient fireplace operation, leading to higher energy bills

A small investment in a professional chimney inspection and sweep can save you thousands of dollars in future repairs and, more importantly, protect your family’s safety.

Ready to Install a Gas Fireplace Insert? Schedule an Inspection Today!

Before you install a gas fireplace insert, make sure your chimney is safe, clean, and ready for the upgrade. A professional chimney inspection and sweep will ensure proper venting, prevent hazards, and give you peace of mind.

At The Irish Sweep, we specialize in thorough chimney inspections and cleanings to prepare your fireplace for a seamless gas insert installation. Contact us today to schedule your chimney service and make your home safer and more efficient!

Can a Clogged Dryer Vent Affect Your Home’s Air Quality? Yes, and Here’s How

Your dryer vent plays a critical role in keeping your home safe and your laundry routine efficient. Designed to expel heat and moisture from your dryer, the vent ensures that damp, lint-laden air is directed outside rather than lingering indoors. However, when the vent becomes clogged with lint, debris, or other obstructions, this essential function is compromised, leading to significant issues.

Did you know that clogged dryer vents are responsible for over 2,900 house fires annually in the U.S.? According to the U.S. Fire Administration, these preventable incidents cause millions of dollars in property damage, as well as injuries and even loss of life. But beyond the fire risk, clogged dryer vents can negatively impact your home’s air quality in ways you may not expect.

From circulating dust and allergens to creating conditions for mold growth, a clogged dryer vent can harm your indoor air and pose health risks for your family. In this blog, we’ll explore how clogged dryer vents affect air quality, the warning signs to watch for, and how to keep your home safe and your air clean.

How Does a Clogged Dryer Vent Impact Air Quality?

When most people think about a clogged dryer vent, they associate it with longer drying times or higher energy bills. However, the impact goes beyond efficiency—it can also significantly affect the air you breathe.

Let’s learn how a clogged dryer vent can directly harm your home’s air quality.

Trapped Moisture and Mold Growth

When a dryer vent is clogged, the moisture-laden air from your laundry has nowhere to go. Instead of being expelled outside, this trapped moisture can accumulate within the vent or surrounding areas, creating the perfect environment for mold growth. Mold thrives in damp, warm conditions and releases harmful spores into the air, which can circulate throughout your home.

Exposure to mold spores can trigger respiratory issues, including asthma, allergies, and other breathing difficulties. For individuals with pre-existing respiratory conditions, these effects can be even more severe. Keeping your dryer vent clear is essential to prevent mold from taking hold and contaminating your indoor air.

Circulation of Contaminants

A clogged dryer vent doesn’t just trap moisture; it also allows lint, dust, and other particles to back up into your home. When these contaminants can’t escape through the vent, they may be blown back into your living space each time you run the dryer.

The American Lung Association warns that poor indoor air quality caused by dust and allergens can worsen allergies and asthma, particularly for children, the elderly, and those with respiratory conditions. Regular maintenance of your dryer vent ensures these particles are properly expelled, protecting the health and comfort of your household.

By addressing these issues, you can improve both your home’s air quality and your family’s well-being. A clean vent ensures your home remains a safe and healthy environment for everyone!

3 Warning Signs of a Clogged Dryer Vent

1. Longer Drying Times

One of the first noticeable signs of a clogged dryer vent is longer drying times. When the vent is obstructed, airflow gest restricted, forcing your dryer to work harder to expel moisture. As a result, clothes take longer to dry, leading to wasted energy and increased utility costs. A clogged vent can reduce your dryer’s efficiency and raise energy consumption, making regular vent checks crucial for both performance and cost savings.

2. Burning Smell

If you notice a burning smell while the dryer is running, this could indicate that lint has accumulated near the heating element. As the lint builds up, it can catch fire, posing a serious fire risk. The heat from the dryer may cause the lint to smolder, creating a dangerous situation in your home. If this odor is detected, it’s essential to clean the vent immediately to avoid potential fire hazards.

3. Visible Lint and Poor Ventilation

Another common sign of a clogged dryer vent is visible lint accumulation around the vent opening or a noticeable reduction in airflow. If you see lint around the dryer vent or feel that air isn’t being expelled as strongly as it should, these are clear indications of an obstruction.

Also, if the outside vent flap doesn’t open fully or closes quickly, it could be a sign that airflow is being blocked. Regular inspections and cleaning will ensure that your dryer vent stays clear and your home stays safe.

Recognizing these warning signs early can help prevent more severe issues, from poor dryer performance to serious fire risks.

Why Ignoring a Clogged Dryer Vent Is Dangerous

We’ve already gone over how clogged dryer vents can affect the air quality in your home—now, let’s discuss the other dangers that can arise from neglecting this important maintenance task.

Fire Hazards

Ignoring a clogged dryer vent not only makes your life harder, but it can also be life-threatening. Lint is highly flammable, and when it accumulates in the vent, it can easily catch fire if it gets too close to the heating elements.

According to the National Fire Protection Association (NFPA), from 2010 to 2014, there were an average of 15,970 home fires each year involving clothes dryers or washing machines. These fires caused 13 deaths, 444 injuries, and $238 million in property damage annually. Most of these fires (92%) were caused by clothes dryers, with lint and dust being the main sources of ignition.

These real statistics underscore the importance of maintaining clear vents to prevent deadly fires.

Energy Inefficiency

Another consequence of ignoring a clogged dryer vent is energy inefficiency. When airflow is restricted, the dryer has to work harder to dry clothes, consuming more energy in the process. This not only increases your utility bills but can also reduce the lifespan of your appliance. With the extra strain on the dryer, components may wear out faster, leading to costly repairs or the need for a replacement. Keeping your vent clean will help your dryer run more efficiently, saving you money and extending the life of the appliance.

Ignoring these risks can have lasting consequences for both your home and your health. Taking the time to maintain your dryer vent ensures safety, improved energy efficiency, and peace of mind.

How to Keep Your Dryer Vent Clean

Here are some key steps to ensure your dryer vent stays clear and your home stays safe.

Doable DIY Maintenance Tips

A few simple steps can help maintain your dryer vent:

  • Clean the Lint Trap After Every Use: Always remove lint from the trap after each load to prevent buildup.
  • Check the Vent Hood for Obstructions: Periodically check the vent hood outside to make sure it’s not blocked by lint, debris, or snow, especially during changing seasons.
  • Vacuum the Area Behind the Dryer: Use a vacuum to remove lint and dust from the area behind and underneath the dryer.
  • Ensure Proper Venting: Make sure the vent hose is not kinked or crushed, as this can restrict airflow.

By performing these easy tasks and scheduling professional cleaning, you’ll keep your dryer vent functioning optimally and reduce risks to your home and health.

Professional Cleaning Services

Although DIY maintenance is helpful, scheduling professional dryer vent cleaning services, like those provided by The Irish Sweep, ensures a more comprehensive clean. Our team uses specialized equipment to remove accumulated lint, dust, and debris from the entire vent system, from the dryer to the outside exhaust.

This thorough process enhances airflow, reduces fire hazards, and helps extend the life of your dryer. With our expert services, you can have peace of mind knowing your home is safer, more efficient, and free from potential risks.

Breathe Easier with a Clean Dryer Vent

Don’t wait for a problem to arise—take action today. Schedule a professional inspection or cleaning with The Irish Sweep to ensure your dryer vent is clear and your home remains safe and efficient. Let us help you breathe easier and keep your home protected from potential hazards.

Fireplace Cleaning Tips from The Irish Sweep: Avoid Common Hazards

A crackling fire in the hearth is one of life’s simple pleasures, especially on a cold evening. But behind the warm glow lies a responsibility: keeping your fireplace clean and safe. Regular fireplace cleaning protects your home from potential fire hazards, improving efficiency, and ensuring cleaner air indoors.

At The Irish Sweep, we’ve spent years helping homeowners maintain their fireplaces, chimneys, and dryer vents with expert care. Our team understands the common pitfalls of fireplace upkeep and how to avoid them, so we’ve gathered some essential tips to help you tackle the task safely and effectively.

In this blog, we’ll break down the risks of neglecting your fireplace, share step-by-step cleaning tips, and explain when it’s time to call in the pros. Whether you’re a seasoned homeowner or new to fireplace care, you’ll find practical advice to keep your hearth in top shape. Let’s get started!

Why Regular Fireplace Cleaning Is So Important

When it comes to maintaining a safe and efficient home, fireplace cleaning is an often-overlooked task that carries significant benefits. From improving air quality to reducing fire hazards, here’s why regular upkeep is essential.

Cleaner Air for a Healthier Home

Every time you use your fireplace, soot, ash, and other particles accumulate. These can easily become airborne, especially during and after a fire, diminishing indoor air quality. This is particularly concerning for those with allergies or respiratory conditions. Regular cleaning minimizes these contaminants, ensuring your home remains a safe and healthy space for everyone.

Reducing the Risk of Chimney Fires

Creosote, a byproduct of burning wood, is a sticky, flammable residue that builds up inside your chimney. Over time, even a thin layer of creosote can pose a serious fire hazard. In fact, creosote buildup is one of the leading causes of chimney fires. Scheduling routine cleanings helps eliminate this risk, giving you peace of mind every time you light a fire.

Boosting Energy Efficiency

A clean fireplace doesn’t just look better—it works better. When ash and debris are removed, airflow improves, allowing fires to burn hotter and more efficiently. This means you get more heat from less wood, saving money and energy while staying cozy. Plus, a well-maintained fireplace reduces the chances of smoke entering your home due to blockages.

Safety and Comfort Go Hand in Hand

Ultimately, regular fireplace cleaning isn’t just about maintenance—it’s about safeguarding your home, enhancing your comfort, and ensuring your fireplace performs at its best. By keeping it clean and hazard-free, you can enjoy the warmth and ambiance of your fire with confidence.

Take the time to care for your fireplace, and it will reward you with safer, cleaner, and more efficient operation for years to come.

Related Reading: How Often Should a Chimney Be Cleaned?

Avoiding Risks During Fireplace Cleaning

Cleaning a fireplace might seem straightforward, but it comes with potential hazards that can compromise your safety if not addressed properly. From hidden dangers like creosote buildup to health risks associated with soot, understanding these risks is the first step toward safe and effective cleaning.

Creosote Buildup: A Hidden Danger

Creosote is a dark, tar-like substance that forms inside your chimney as a byproduct of burning wood. It’s sticky, highly flammable, and builds up layer by layer over time. Even a small amount of creosote can ignite under the right conditions, potentially causing a dangerous chimney fire.

DIY cleaning might seem like a cost-effective solution, but it often leaves behind residue that only professional-grade tools can remove. Over time, this leftover creosote can accumulate, turning your fireplace into a ticking time bomb. For thorough and safe cleaning, regular professional inspections and maintenance are essential.

Inhaling Soot and Dust

Fireplace cleaning can stir up soot and dust, which contain harmful particles. Inhaling these particles can irritate your respiratory system and pose serious health risks, especially for individuals with asthma or allergies. Prolonged exposure may even lead to more severe respiratory issues over time.

To minimize risks, always work in a well-ventilated area and wear protective gear, such as a mask and safety goggles. Taking these precautions not only protects your health but also ensures a safer cleaning process.

Structural Issues

Your fireplace’s structure is just as important as its cleanliness. Over time, the bricks, mortar, or chimney liner can develop cracks or other damages that are easy to overlook during casual cleaning. These issues may allow heat, smoke, or even flames to escape into areas where they shouldn’t, creating serious safety hazards.

A visual inspection can help identify obvious problems, but a professional chimney sweep can detect hidden structural issues that require immediate attention. Regular inspections are crucial to catching these problems early and preventing costly repairs—or worse, a house fire.

The Bottom Line

Fireplace cleaning is not without its risks, but understanding these hazards can help you navigate the process safely. With the right precautions and professional assistance, you can keep your fireplace in optimal condition and avoid unnecessary dangers.

Fireplace Cleaning Tips for a Safer Home

Keeping your fireplace clean enhances its performance and protects your home and loved ones from potential hazards. By following these step-by-step tips, you can clean your fireplace safely and efficiently.

Gather the Right Tools and Equipment

Before you begin, make sure you have everything you need for a thorough cleaning. Essential tools include:

  • A sturdy fireplace brush for scrubbing away soot and residue.
  • A fireplace vacuum or shop vac designed to handle ash.
  • Drop cloths to protect your flooring and nearby furniture.
  • A dust mask and safety goggles to protect yourself from inhaling particles.

Using the proper tools is critical. Brushes designed for fireplaces won’t damage the firebox or chimney, and specialized vacuums can handle ash without spreading it around your home. Skimping on tools can lead to incomplete cleaning or even damage to your fireplace.

Clean the Firebox

The firebox, where the fire burns, requires regular cleaning to remove ash and debris. Here’s how to do it safely:

  1. Wait Until Cool: Ensure the fireplace and ash are completely cool before you begin.
  2. Remove Ash and Debris: Use a small shovel to scoop out ash and dispose of it in a metal container.
  3. Scrub the Firebox: Use your fireplace brush to scrub away soot from the walls of the firebox.
  4. Vacuum the Residue: Use a fireplace vacuum to remove fine ash and remaining particles for a clean finish.

Regularly cleaning the firebox prevents ash buildup and ensures optimal airflow for your next fire.

Inspect and Maintain the Chimney

While cleaning the fireplace, don’t forget to check the chimney. It’s essential to inspect for blockages or creosote buildup:

  • Check for Obstructions: Look up the chimney with a flashlight to ensure there are no nests, leaves, or other debris blocking the flue.
  • Assess Creosote Levels: Use a flashlight to check the chimney walls for shiny, dark creosote deposits. If the buildup is more than 1/8 inch thick, it’s time for a professional cleaning.
  • Test the Damper: Ensure the damper opens and closes smoothly. A malfunctioning damper can lead to smoke backdrafting into your home.

For anything beyond a surface-level inspection, call a professional chimney sweep. They have the tools and expertise to address deeper issues and ensure your chimney is safe to use.

By using the right tools, cleaning the firebox regularly, and inspecting the chimney, you can enjoy a fireplace that’s clean, efficient, and safe. Don’t forget: If anything seems beyond your expertise, The Irish Sweep is always here to help.

Why Professional Fireplace Cleaning Matters

While regular maintenance can help keep your fireplace in good condition, there are times when calling in a professional is essential. Experts bring the tools, training, and experience to handle the tough jobs and ensure your fireplace is as safe as possible.

Deep Cleaning and Hazard Prevention

Even the most diligent DIY efforts can fall short when it comes to thoroughly cleaning a fireplace. Creosote deposits, soot in hard-to-reach places, and hidden structural issues require specialized equipment and expertise to address. Professionals use high-grade tools and techniques to clean every inch of your chimney and fireplace, eliminating fire hazards and ensuring proper airflow.

By hiring a professional, you gain peace of mind knowing your fireplace isn’t just clean—it’s safe to use. Professionals can also identify and address problems like cracks, loose bricks, or liner damage, which can go unnoticed during DIY cleaning.

Annual Inspections for Peace of Mind

An annual inspection by a certified chimney sweep is one of the best ways to ensure your fireplace remains in top condition. Professionals evaluate the entire system, from the firebox to the chimney cap, checking for blockages, damage, and buildup that could pose safety risks.

The Irish Sweep, a proud member of the National Chimney Sweep Guild (NCSG), adheres to the highest industry standards. This membership underscores their commitment to professionalism and expertise, giving homeowners confidence that their fireplaces are in capable hands.

By scheduling regular professional cleanings and inspections, you’re not just maintaining your fireplace—you’re protecting your home and loved ones from preventable dangers. Don’t wait for a problem to arise; call the experts to keep your fireplace operating safely and efficiently.

How to Maintain a Clean Fireplace Between Services

Keeping your fireplace in good condition doesn’t stop at professional cleanings. Simple, ongoing maintenance can go a long way in preserving its safety and efficiency. One of the most effective ways to reduce buildup and keep your fireplace cleaner is to focus on the type of wood you burn.

Burn the Right Wood

Not all firewood is created equal. For a cleaner burn and less creosote buildup, seasoned hardwood is the gold standard. This type of wood has been dried for at least six months to a year, reducing its moisture content. Drier wood burns hotter and more efficiently, producing less smoke and creosote—a win for both your fireplace and chimney.

Hardwoods like oak, maple, and hickory are excellent options because they burn longer and hotter than softer woods like pine. On the other hand, burning unseasoned or “green” wood can create excessive smoke and lead to faster creosote accumulation, increasing the risk of chimney fires.

By choosing seasoned hardwood for your fires, you’re not only making maintenance easier but also enjoying a cleaner, safer, and more efficient fireplace experience. Regularly restocking with quality wood ensures you’re protecting your investment and getting the most out of your hearth.

Related Reading: What is the Best Wood to Burn in a Fireplace? To Burn or Not to Burn

Enjoy a Cleaner, Safer Fireplace All Year Long

Fireplace cleaning is a critical part of maintaining a safe and efficient home. Regular upkeep helps improve air quality, reduces fire risks, and ensures your fireplace operates at its best. By taking simple steps like burning the right wood and scheduling annual professional inspections, you can enjoy the warmth and ambiance of your hearth without worry.

When it comes to deeper cleaning and inspections, trust the experts at The Irish Sweep. As a proud member of the National Chimney Sweep Guild, we’re dedicated to providing top-quality service and ensuring your fireplace is safe for years to come.

Ready to schedule your professional cleaning or inspection? Book your appointment today. Don’t wait—ensure your fireplace is ready for the season ahead!

Why Is My Dryer Not Drying? + 7 Other Dryer Vent FAQs

If you’ve ever pulled a load of clothes from the dryer only to find them still damp, you’re not alone. A dryer not drying properly is a common issue that can be both frustrating and puzzling, especially if you’re not sure where to start troubleshooting. There are several reasons why a dryer might fail to dry clothes efficiently, from simple user errors to hidden maintenance issues, like a clogged dryer vent.

In this guide, we’ll go over some of the most frequently asked questions about dryer problems, including the top reasons for a dryer not drying properly and how to solve them. Whether you’re dealing with a vent blockage, thermostat issues, or even overloaded cycles, understanding how your dryer works can help you identify the problem and get your appliance back in peak condition.

Read on to find out why your dryer isn’t drying and what you can do to fix it, along with answers to other common dryer vent questions!

Common Reasons for a Dryer Not Drying Properly

When your dryer isn’t drying clothes as it should, the issue could stem from several common culprits. Here’s a breakdown of the primary reasons your dryer may not be performing efficiently, along with tips for identifying and resolving each one.

1. Clogged Dryer Vent

  • Why It Matters: A clogged dryer vent is one of the most common reasons for a dryer not drying properly. When lint builds up in the vent, it restricts airflow, causing the dryer to overheat or operate inefficiently. This can lead to extended drying times, increased energy bills, and even a potential fire hazard if left unchecked.
  • How to Fix It: While minor clogs can sometimes be handled by disconnecting your dryer from power and using a vacuum or a specialized dryer vent cleaning kit, DIY cleaning often won’t remove all of the deeply embedded lint and debris. For the best results—and especially if it’s been more than a year since your last deep clean—consider hiring a professional dryer vent cleaning service. Professionals have the tools and expertise to remove lint from every corner of the vent system, ensuring optimal airflow and reducing the risk of future clogs. Routine professional cleaning, typically every six months to a year, can keep your dryer running smoothly and extend its lifespan.

2. Dirty Lint Filter

  • Why It Matters: Even though most people know to clean the lint filter after each load, it’s easy to forget or assume it doesn’t make a big difference. However, a full lint filter can obstruct airflow, leading to a dryer not drying effectively.
  • How to Fix It: Clear out the lint filter after every load, and wash it monthly with soap and water to remove any residue from fabric softeners or dryer sheets.

3. Overloaded Dryer

  • Why It Matters: Overloading the dryer with too many clothes can lead to insufficient drying. If there’s not enough room for the air to circulate, your dryer won’t be able to dry clothes evenly.
  • How to Fix It: Stick to recommended load sizes for your dryer model. If you have a large load, try drying it in two smaller batches instead.

4. Malfunctioning Heating Element

  • Why It Matters: A faulty heating element can prevent your dryer from reaching the right temperature, resulting in a dryer not drying clothes properly.
  • How to Fix It: If you suspect a heating element issue, consult the dryer’s manual for troubleshooting steps. In most cases, a broken heating element will require a professional repair or replacement.

5. Thermostat or Thermostat Fuse Issues

  • Why It Matters: The thermostat and thermal fuse regulate the dryer’s temperature. If either part is malfunctioning, the dryer may not heat up correctly, leaving clothes damp.
  • How to Fix It: A multimeter can help test these components. If they aren’t working as they should, consider hiring a professional to replace them, as these repairs can be complex.

Signs You Need Professional Dryer Vent Cleaning

Sometimes, even with regular maintenance, dryer vents can still become clogged over time. Recognizing the warning signs of a blocked vent can help you prevent bigger issues down the road. Here are some clear indicators that it’s time to call in a professional:

1. Clothes Take Too Long to Dry

  • What to Look For: If clothes are taking longer than a single cycle to dry, this is a strong sign that your dryer vent may be clogged. A dryer not drying efficiently often means there’s insufficient airflow due to lint buildup.
  • Why It Matters: When clothes stay damp for longer periods, it increases wear on the fabric and puts extra strain on your dryer’s motor.

2. Burning Smell While Dryer Is Running

  • What to Look For: A burning smell coming from the dryer is never a good sign. Lint buildup in the vent can start to overheat, causing the faint smell of something burning.
  • Why It Matters: Excessive lint buildup is highly flammable, making this smell a potential fire hazard. If you notice any unusual odors, turn off your dryer immediately and contact a professional to inspect and clean the vent.

3. Dryer Feels Excessively Hot

  • What to Look For: If your dryer or the clothes inside feel unusually hot to the touch, there could be restricted airflow causing the machine to overheat.
  • Why It Matters: Overheating can shorten the lifespan of your dryer and damage its components, leading to costly repairs down the line. It’s also a safety risk if not addressed.

4. Excessive Lint Around the Dryer or Outside Vent

  • What to Look For: If you notice more lint than usual around your dryer or in the area where the vent exits your home, this could mean that lint is backing up due to a clog.
  • Why It Matters: When lint builds up inside the dryer and vent, it compromises the dryer’s efficiency and puts you at risk of a vent fire. Visible lint accumulation often means the vent needs professional attention.

5. Dryer Shuts Off Mid-Cycle

  • What to Look For: Many modern dryers have a built-in safety feature that automatically shuts off the machine if it overheats. If your dryer frequently stops mid-cycle, a blocked vent could be causing it to overheat.
  • Why It Matters: An automatic shutdown is a safety response to overheating. Frequent shutdowns not only disrupt your laundry routine but can also signal underlying issues that need prompt attention.

If you notice any of these signs, scheduling a professional dryer vent cleaning can help you restore your dryer’s performance, save energy, and reduce safety risks. In the next section, we’ll cover essential FAQs about dryer maintenance and tips for keeping your dryer vent clear between professional cleanings.

FAQs About Dryer Maintenance and Vent Cleaning

Taking care of your dryer and its vent system can keep your machine running efficiently and prevent common issues from cropping up. Here are some frequently asked questions about dryer maintenance and dryer vent cleaning to help you extend the life of your appliance and avoid costly repairs.

Q. How Often Should I Clean My Dryer Vent?

Answer: For most households, a thorough dryer vent cleaning every six months to a year is recommended. However, if you use your dryer heavily or have a large household, you may need to clean it more frequently. Regular cleaning keeps lint buildup at bay, ensuring proper airflow and helping your dryer operate efficiently.

Q. What Happens If I Don’t Clean My Dryer Vent?

Answer: Neglecting regular vent cleaning can lead to a range of problems, from a dryer not drying clothes completely to more serious hazards like overheating and potential fires. Lint buildup restricts airflow, which can cause the dryer to work harder, use more energy, and increase wear on its parts. In worst-case scenarios, excessive lint can ignite, causing a fire hazard in your home.

Q. Can I Clean the Dryer Vent Myself?

Answer: While it’s possible to clean the dryer vent yourself, a professional cleaning is often more thorough, as experts have specialized tools to reach deep into the vent and remove all accumulated lint and debris. You can still perform routine maintenance by clearing the lint filter after each load and occasionally using a vacuum to remove visible lint from the vent opening. However, for a deep clean, professional services are recommended.

Q. How Can I Tell If My Dryer Needs Maintenance?

Answer: Signs that your dryer needs maintenance include extended drying times, unusual noises, a burning smell, excessive heat, or frequent mid-cycle shutdowns. Any of these issues could indicate a problem with airflow or an internal component. Routine maintenance can help address these issues before they become bigger problems.

Q. Are Dryer Sheets or Fabric Softeners Safe to Use?

Answer: Dryer sheets and fabric softeners are generally safe, but they can leave a residue on your dryer’s lint filter, reducing airflow. This buildup can make your dryer work less efficiently, contributing to a dryer not drying clothes thoroughly. To avoid this, wash your lint filter in warm soapy water once a month to remove any residue.

Q. Why Is My Dryer Overheating?

Answer: Overheating is often caused by a clogged vent, which restricts airflow and traps heat inside the dryer. Other potential causes include a malfunctioning thermostat or heating element. If you’re experiencing overheating, it’s best to stop using the dryer until you can have the vent inspected and cleaned by a professional.

Q. How Can I Keep My Dryer Running Efficiently Between Professional Cleanings?

Answer: In addition to clearing the lint filter after each load, you can help your dryer run efficiently by:

  • Avoiding overloading it with clothes.
  • Using shorter drying cycles when possible.
  • Cleaning around the dryer and vent area to prevent dust buildup.
  • Keeping the area around the dryer vent outlet clear to allow proper airflow.

By staying on top of routine dryer maintenance and knowing when to call in a professional, you can keep your dryer working smoothly, reduce energy costs, and enhance safety in your home.

dryer not drying

Pro Tips to Extend the Life of Your Dryer and Improve Efficiency

Taking extra steps to maintain your dryer not only improves its efficiency but can also add years to its lifespan. Here are some practical tips for keeping your dryer in excellent shape, reducing energy costs, and preventing breakdowns.

1. Clean the Lint Filter After Every Load

  • Why It Matters: Clearing out the lint filter after each use is one of the simplest ways to keep your dryer running efficiently. A clean filter allows better airflow, helping clothes dry faster and reducing the strain on your dryer’s motor.
  • Pro Tip: Every month, wash the lint filter with warm, soapy water to remove any fabric softener or dryer sheet residue that can clog the mesh.

2. Avoid Overloading the Dryer

  • Why It Matters: Overloading prevents even airflow, meaning clothes take longer to dry and your dryer has to work harder. This can lead to a dryer not drying clothes thoroughly and cause wear on the motor and other parts.
  • Pro Tip: Stick to the recommended load size, and for large or bulky items like comforters, consider drying them separately to ensure adequate airflow.

3. Use Dryer Balls or Clean Tennis Balls

  • Why It Matters: Dryer balls help keep clothes separated, improving airflow and reducing drying time. They’re an eco-friendly alternative to dryer sheets and can save energy while fluffing clothes naturally.
  • Pro Tip: Place two to four dryer balls in each load to maximize efficiency. They’re especially helpful for bulky items like towels and bedding.

4. Opt for Lower Heat Settings When Possible

  • Why It Matters: High heat settings may seem faster, but they can damage fabrics and cause the dryer’s heating element to wear out sooner. Lower temperatures are often just as effective and gentler on your clothes and your appliance.
  • Pro Tip: Use the “Eco” or “Low Heat” setting for most loads. While it may take a bit longer, this reduces energy usage and minimizes wear on your dryer.

5. Keep the Area Around the Dryer Vent Clear

  • Why It Matters: Obstructions around the outside vent can block airflow, leading to overheating and inefficiency. By keeping this area free of clutter, you’re ensuring that air can escape freely, allowing your dryer to work as intended.
  • Pro Tip: Regularly check the outside vent for any buildup of lint or debris, and make sure there’s at least a foot of clear space around it for optimal ventilation.

6. Schedule Annual Professional Inspections

  • Why It Matters: Even with regular maintenance, your dryer can still develop issues that aren’t visible. Scheduling a yearly inspection and vent cleaning by a professional can catch problems early and keep your dryer running smoothly.
  • Pro Tip: Mark a calendar reminder each year for a professional cleaning and inspection. This simple habit can help you avoid costly repairs and ensure your dryer is safe and efficient.

7. Check and Tighten Loose Parts Periodically

  • Why It Matters: Over time, vibrations from normal use can cause screws, knobs, and other parts to loosen. Checking these components can prevent minor issues from becoming larger problems.
  • Pro Tip: Unplug the dryer and give it a quick check every six months, especially around the drum and door. Tightening loose parts is a simple way to extend the appliance’s lifespan.

By following these tips, you’ll be able to maintain a dryer that works more efficiently, keeps clothes in better condition, and consumes less energy. Incorporate these small maintenance habits into your routine, and your dryer will stay in top shape for years, helping you save on both repairs and energy costs!

Schedule Your Professional Dryer Vent Cleaning with The Irish Sweep Today

Ready to keep your home safe and your dryer running efficiently? Don’t wait for lint buildup to become a problem—schedule a professional dryer vent cleaning with The Irish Sweep today! Our team of certified experts will thoroughly clean your dryer vent, improving performance, reducing fire hazards, and extending the life of your dryer. Call us now or book online to enjoy a safer, more efficient home.

Safety PSA for Storms in the Bay Area: Roads, Chimneys, and More

Hello Bay Area residents! As your local chimney and dryer vent experts in the Bay Area, The Irish Sweep is here with an important safety PSA for our neighbors on storm safety.

As you likely noticed, we got hit hard with atmospheric river storms last year. The heavy rain, thunderstorms, hurricane-force wind gusts, and flooding can all be attributed to powerful bands of moisture transporting vast amounts of water vapor from the Pacific Ocean toward our coast.

While these storms deliver much-needed rainfall, unfortunately, they’ve also left a trail of damage across our beloved Bay Area and the rest of California. In the last year, we’ve seen:

  • Three deaths in fallen tree incidents associated with the severe weather
  • Power outages for tens of thousands of PG&E customers
  • Large surf over 30 feet
  • Widespread damage and flooding, including river flooding
  • Mudslides in Los Angeles
  • Gusty thunderstorm outflow winds, including wind gusts over 100 mph
  • Waterspouts
  • Several reported shallow landslides

While we can’t control the weather, we can control our preparedness. That’s why we’re here to share some crucial safety tips to ensure your home and family stay safe during this storm. Prioritizing prevention and peace of mind is more important than ever when it comes to unexpected weather. Let’s weather this storm together, safely and soundly!

Road Safety: Navigate the Downpour with Caution

When it comes to navigating the roads during harsh weather, remember this powerful truth: your actions don’t just impact you, they impact everyone around you. Every responsible decision you make on the road ripples outwards, creating a safer environment for fellow drivers, pedestrians, cyclists, and anyone else sharing the asphalt arteries.

Before the storm clouds gather, take steps to ensure safe travels:

  • Stay Informed: Check weather alerts and forecasts regularly. Know what’s coming and plan accordingly.
  • Vehicle Checkup: Make sure your car is up-to-date on maintenance – get an inspection if you’re due. Ensure tires have proper tread, wipers are in good condition, and headlights are bright.
  • Prepare for the Unexpected: Pack an emergency kit in your car with essentials like water, snacks, a blanket, jumper cables, and a first-aid kit.
  • Plan B Ready: Have alternative routes in mind in case of flooding or road closures. Remember, the shortest route may not be the safest during a storm.

During a storm, prioritize safety over speed:

  • Stay Off the Road: If possible, avoid driving unless absolutely necessary. Let nature take its course and stay safe at home.
  • Slow and Steady Wins the Race: If you must drive, reduce your speed significantly. Maintain ample following distances to give yourself plenty of stopping time.
  • Beware the Hydroplane: Be aware of slippery conditions and how to handle hydroplaning. Ease off the gas and steer smoothly if your car starts to lose traction.
  • Flooded Roads? Turn Around!: Never, ever attempt to drive through flooded roadways. Just six inches of water can sweep away a car, and hidden dangers like debris and damaged infrastructure lurk beneath the surface.
  • Debris and Downed Lines: Keep a watchful eye for fallen trees, branches, and downed power lines. Report them to authorities immediately and avoid approaching them.

After the storm subsides, be patient and proceed with caution:

  • Expect Delays: Allow extra time for your commute due to potential road closures or debris removal.
  • Report Hazards: If you encounter downed power lines or other hazards, report them to the appropriate authorities immediately.
  • Drive Cautiously: Even after the rain stops, roads may still be slippery. Continue to drive slowly and cautiously until conditions improve fully.

Chimney Safety: Don’t Let Your Chimney Become a Storm Casualty

A healthy chimney can weather any storm. Here’s how to ensure it stays in top condition:

Before A Storm Hits:

  • Professional Protection: Schedule a pre-storm inspection and cleaning by a certified chimney sweep. They’ll identify any potential issues and remove built-up creosote, reducing the risk of chimney fires.
  • Seal the Leaks: Secure loose chimney caps and flashing to prevent water infiltration and potential damage to your roof and interior.

While The Storm Rages

  • Damper Down: If you have a wood-burning fireplace, close the damper before the storm arrives. This prevents wind and rain from entering the flue, which can damage the chimney and create drafts in your home.
  • Keep an Eye Out: Stay alert for any signs of damage, such as cracked bricks, loose mortar, or sparks escaping from the chimney. If you see anything concerning, contact a professional immediately.

After the Storm Passes:

  • Thorough Inspection: Once the storm clears, conduct a thorough visual inspection of your chimney for any cracks, leaks, or other damage. Look for loose bricks, missing mortar joints, or stains on the chimney exterior or interior walls.
  • Don’t Delay Repairs: If you discover any damage, don’t hesitate to hire a qualified chimney repair specialist. Addressing issues promptly prevents further damage, ensures the safety of your home, and protects your loved ones.

Remember, a well-maintained chimney is a safe chimney. By following these simple steps, you can ensure your chimney stands strong against the elements, keeping your home warm and protected throughout the storm and beyond.

Beyond the Basics: General Safety Tips 

Storm preparedness extends beyond roads and chimneys. Here are some additional tips to fortify your home and family:

  1. Build Your Home’s Emergency Arsenal: Prepare an emergency kit for your home, stocked with non-perishable food, water, first-aid supplies, medications, flashlights, a battery-powered radio, and essential hygiene items. This kit should last your family for at least 72 hours in case of power outages or evacuations.
  1. Secure Outdoor Furniture: Secure outdoor furniture, decorations, and any loose items that could become projectiles in high winds. Remember, even a lightweight object can cause significant damage when hurled by a storm.
  1. Stay Informed, Stay Empowered: Don’t be caught off guard! Stay updated on weather alerts and warnings from official sources like the National Weather Service and local emergency management agencies. This allows you to make informed decisions and take necessary precautions.
  1. Know Your Escape Route: Familiarize yourself with your evacuation plan and have essential supplies like important documents, clothing, and cash readily accessible. This ensures a smooth and swift evacuation if needed.
  1. Floodwaters: Floodwaters are not your friend! Never drive through flooded areas, as even shallow water can hide dangers like debris, damaged roads, and strong currents. Follow flood safety guidelines and prioritize your safety over convenience.
  1. Power Lines: Downed power lines pose a serious danger. Never touch them, even if they appear inactive. Treat them as live wires and maintain a safe distance. Report downed lines immediately to the authorities.

By incorporating these additional tips into your storm preparation routine, you create a multi-layered shield of protection for your home and family.

As the storm clouds gather, remember: your actions hold the power to write a story of safety and resilience. Prepare, be informed, and prioritize safety above all else. Your responsible choices not only protect yourself but also contribute to a safer Bay Area community. By following the tips outlined here, you can equip yourself and your loved ones to navigate even the fiercest storm with confidence.

At The Irish Sweep, your local chimney and dryer vent experts, we’re committed to your well-being. We understand that a well-maintained chimney is a key part of storm preparedness, ensuring proper ventilation and preventing potential hazards. That’s why we offer comprehensive chimney inspections, cleanings, and repairs, ensuring your chimney stands strong as a guardian against the elements.

Schedule your pre-storm chimney inspection today and rest assured, knowing your home is protected.

Stay safe, Bay Area!

© Copyrights 2026 The Irish Sweep All Rights Reserved.