When was the last time you had your Danville dryer vents cleaned? Read Article about Tips on Having Your Dryer Vents Cleaned by a Professional
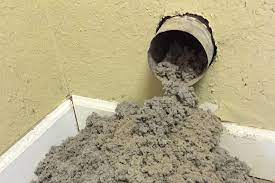
If it’s been a while, don’t put this essential home maintenance off any longer. Did you know that a clogged dryer vent that accumulates lint is actually a fire hazard? Dirty dryer vents start thousands of fires each year in the United States. Here are some basics you need to know about Danville dryer vent maintenance.
A Messy Chore
It’s a messy chore, but someone has to do it. At the bare minimum, your Alameda dryer vents should be cleaned out on a yearly basis to keep the appliance working at peak performance. This is especially true if some of the occupants of the house have long hair or if there are pets in the home that shed. Also did you know that dryer sheets leave a sticky residue inside the vent and, of course, the lint from the dryer is prone to sticking to that residue.
There are some common signs to watch out for, such as a burning smell, clothes that just won’t seem to dry no matter how long you leave it running, and also a dryer that becomes hot to the touch.
Cleaning Your Alameda Dryer Vents
First things first, a professional will disconnect your dryer before getting to work. Whether it’s gas or electric, it can simply be unplugged from the outlet, so know that we don’t need to touch the gas supply valve. The vent can be found at the back of the dryer, and the exhaust should always vent to the outside atmosphere. A professional will then pull the appliance about a foot away from the wall so they can access the vent and the area behind the dryer. After a pro has taken these steps, they will disconnect the vent connector from the dryer and the vent. If the vent connector is made from plastic or other flammable material, it will be replaced with an all-metal, non-combustible option.
Wearing protective gloves, they will then clean out all the lint from the back of the dryer by hand, and then use a brush with a series of rods to brush the lint from the interior venting ductwork. Once completed, a leaf blower will be attached to the vent and all loose debris will be cleared to finish the job. And finally, the exterior vent cover will also be removed and cleaned out before the dryer is reconnected for use.
Schedule a Danville Dryer Vents Cleaning
A professional will also be able to make sure that everything is up to code and doesn’t need to be replaced. Your safest option is always to call an expert who can make sure your dryer isn’t a fire hazard. Carbon monoxide poisoning is also a risk if a dryer isn’t installed correctly, or maintained over the years.
At The Irish Sweep, we have the experience you need for such an important job. If you’re in the Alameda area, give us a call at (510) 521-4088. We’re available to answer any questions you have about dryer or fireplace safety in your home. You can also view our customer testimonials by clicking this link.